Migrate From HTTP To HTTPS On Blogger Blog With Custom Domains – Free SSL!

Hello, fellow bloggers, today I have great news, or you can say a gift for all of your blogger blogs but first, let me ask some question from you. Do you want to make your blogger blog more professionally?
Do you want to make a secure connection between your blog and visitors?
Do you want to make your blogger blog fast using CDN?
Do you want to improve your blog’s ranking on Google?
And do you want to know how to enable free SSL Certificates on Blogger blog with the custom domain?
If your answer is “right” for all four above question, then you’re at the right place. We all know that the Blogger platform is giving the free SSL HTTPS certificates for Blogspot blogs, and it is a nice gift for your blog. But we also knew that these SSL certificates are only available for Blogspot subdomains, means if you are using any custom domain on your blogger blog then not able to add or enable the free SSL (HTTPS) certificate on your blog.
But Google will release this feature soon for the custom domain also, Why waiting for Google when you can get the free SSL certificates for your custom domain. Yes, you read that right you can enable the HTTPS on your blogger blog even if you are using a custom domain name for your blog. This is the very tricky guide to get free SSL certificates but we’ve divided this guide into 3 parts which will help you to easily follow all steps. We all know the advantages of using HTTPS on your blog. Thanks to Shivansh Verma from BloggerGuider, he has been shared this guide on his blog, so all credits goes to him.
Advantages of using SSL Certificates on Blog/Website
- Your Blog will look more professional
- SSL Certificates will make a secure connection between visitors and blog
- Here We’ll use Cloudflare’s Flexible SSL, with help of Content Delivery network your blog will load fast
- Using HTTPS, your blog’s ranking in Google and other search engines will improve
The significant benefit of using HTTPS is the increase in SERP ranking, and Google will rank the 30% of the websites on the first page which are SSL certified, so you have a great chance to make your blog more SEO optimize and beat your competitors.
But below are some disadvantages of using this trick to enable the HTTPS certificates on Blogger blogs.
- During migrating your blog from HTTP to HTTPS your, some traffic will decrease for few days until Google crawls and indexes your all URLs with HTTPS
- Once you completely migrated to HTTPS then you’ll no be able to remove the HTTPS, and when you try to remove then you’ll lose your traffic, and maybe Google will deindex your blog.
How To Get Free SSL Certificates (HTTPS) For Blogger Blog With Custom Domain
So finally wait is over, Google has been released the official SSL certificates (HTTPS) for blogger blogs with the custom domain, and it’s super easy to do this, just follow below steps to get free SSL for blogger blogs with the custom domain.
- Open your Blogger dashboard via this link
- Go to settings >> Basic and just enable the “HTTPS Availability” to “Yes”
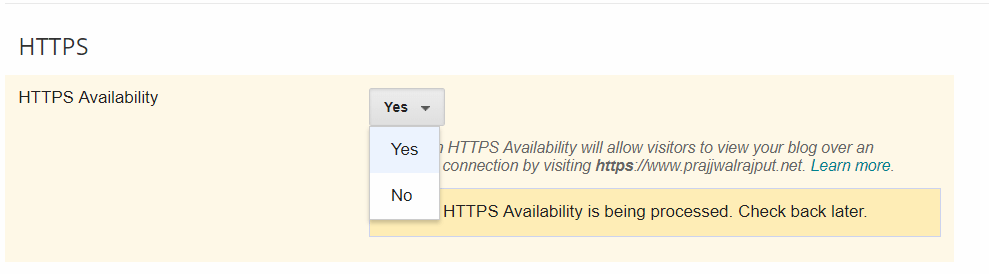
- Once you enabled this, the page will reload and you’re done!
So, guys, this is easiest and official ways to enable the HTTPS on the blogger blog, I’m pretty sure you liked this and you’re now happy that your blog has SSL certificates.
But now you’ll face some mixed content issue on your blog, so to fix this keep reading this post to fix the mixed content issue, that’s also simple.
[su_note note_color=”#f1c40f” text_color=”#ffffff”]Update: Google has Officially released the SSL Certificates for Blogger Blogs with Custom domains, So you no longer need to follow Cloudflare method to add SSL on your domain but in case if you want a free CDN then you can use it without any problem :)[/su_note]
How To Migrate Your Blogger Blog From HTTP to HTTPS Even You’re Using A Custom Domain:
So, here we’re going to explain each and every step to make your blog most secure, fast and professional look. In this guide, we’ll use the Cloudflare’s free CDN (Content Delivery Network) to protect your blog from attacks, make it faster than ever and also improve SERP. We divided this post in 5 Section to make the process easier to understand and simple.
1. Add Cloudflare CDN On Blogger Blog:
This is the first part of this guide. You need to follow the below steps to add Content Delivery Network on your blogger blog follow below steps.
- Firstly, create a new account on CloudFlare, and then you’ll need to add your domain to it and click on “Scan DNS Records.”
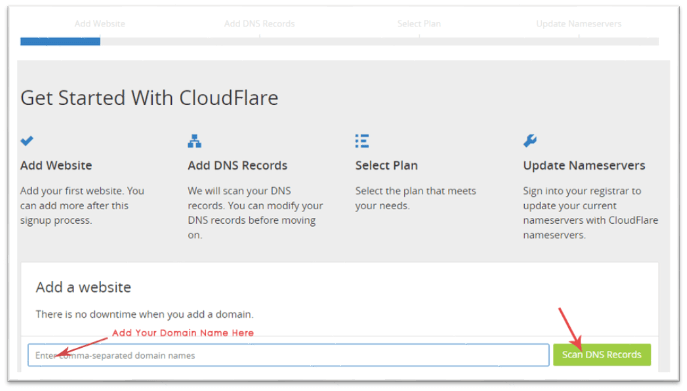
- After adding your domain, it will 1 minute to scan your domain’s DNS records
- Once Canning progress is completed, CloudFlare gives you two custom name server, and you need to replace those with your default domain name servers. Follow below steps to add Cloudflare’s nameservers in your Domain name.
1. Open your Domain registrar dashboard or My Account page, then Go to Domain’s Setting
2. There you’ll see something like “change nameservers” or something like nameservers
3. Then you need to select “Custom Nameservers” and add the Cloudflare’s nameservers which are provided after added your domain name. - Once you replace your nameservers with Cloudflare’s nameserver, means your domain is now using the Content Delivery Network.
Read Also: Trick to Getting Free Unlimited Google+ Followers [Real]
2. Enable SSL Certificate (HTTPS) On Your Domain Name:
Now it’s time to enable the HTTPS on your Domain Name with the Cloudflare. It is the main part if this guide to enable HTTPS on Custom Domain in Blogger blog. Follow below steps to enable SSL certificates.
- Go To the “Crypto” tab on CloudFlare’s account
- Then select the “Flexible” option from the SSL section.
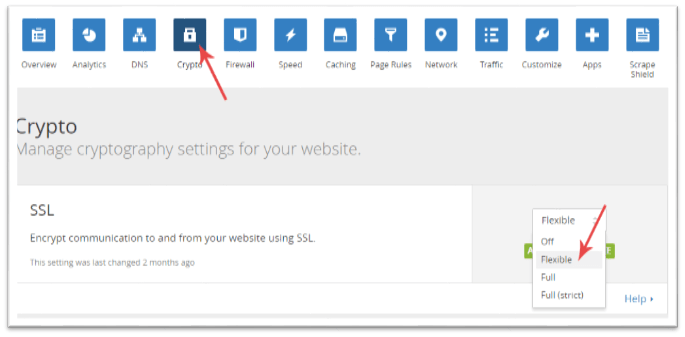
- Congratulation! You’ve successfully enabled the SSL (HTTPS) Certificates on your Blogger blog’s custom domain.
3. Redirect domain, sub-domains, and Permalinks from HTTP to HTTPS:
This is the most important part of this guide because you’ve to let your blog stop using the old HTTP and redirect your blog to new SSL (HTTPS). Follow all below steps carefully.
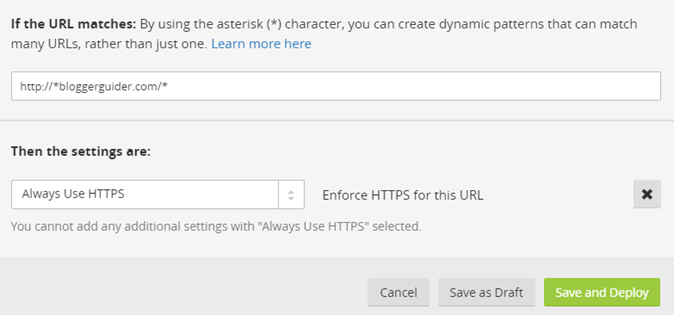
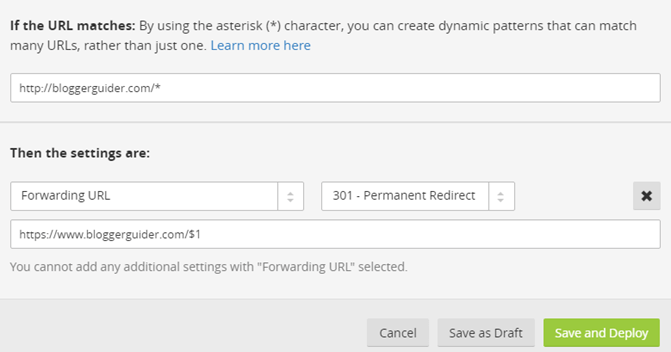
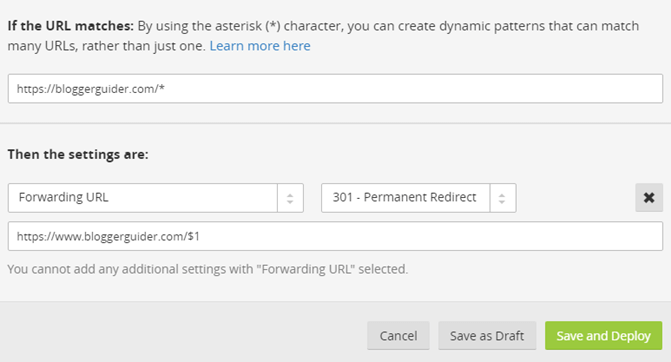
- Go to the “Page Rules” tab and then you have to add 3 Page Rules as shown in below images.
- But remember you need just to change “bloggerguider.com” with your “domain name”.
- After creating all 3 Page Rules correctly, Go to the “Firewall” tab
- In the Security Level section choose the “Low” option.
- Now we no need of Cloudflare anymore, so log out your Cloudflare account.
Now open your blog, and you will see that your blog’s homepage is automatically redirecting to HTTPS version. But now your blog’s permalinks is not in the HTTPS version, so we need to make all of them HTTPS and redirect the complete blog from HTTP to HTTPS.
- Now open your blog’s template HTML Editor
- And search for the “</head>” tag (without quotes) and paste the following code above the </head>
<script>
$(document).ready(function()
{           $("a").each(function()
{             var i = $(this).attr("href");
 var n = i.replace(http://www.yourdomain.com, "https://www.yourdomain.com");                               $(this).attr("href", function() {               return n             })           })         });       </script>
Now after this, find the below code in your template:
-
<b:include data='blog' name='all-head-content'/>
-
Remove it and add the following code below the “<head>” tag
<link href='https://www.yourdomain.com/favicon.ico' rel='icon' type='image/x-icon'/>
<meta content='blogger' name='generator'/>
<link href='https://www.yourdomain.com/feeds/posts/default' rel='alternate' title='BLOGTITLE - Atom' type='application/atom+xml'/>
<link href='https://www.yourdomain.com/feeds/posts/default?alt=rss' rel='alternate' title='BLOGTITLE - RSS' type='application/rss+xml'/>
<link href='https://www.blogger.com/feeds/BLOGID/posts/default' rel='service.post' title='BLOGTITLE - Atom' type='application/atom+xml'/>
<!--[if IE]><script type="text/javascript" src="https://www.blogger.com/static/v1/jsbin/2591933621-ieretrofit.js"></script>
<![endif]-->
<meta expr:content='data:blog.url' name='og:url:domain'/>
<!--[if IE]> <script> (function() { var html5 = ("abbr,article,aside,audio,canvas,datalist,details," + "figure,footer,header,hgroup,mark,menu,meter,nav,output," + "progress,section,time,video").split(','); for (var i = 0; i < html5.length; i++) { document.createElement(html5[i]); } try { document.execCommand('BackgroundImageCache', false, true); } catch(e) {} })(); </script> <![endif]-->
- Now save your template.
Note: If your images are not on SSL certificates then upload your images to secure and free images hosting sites like Postimg.org, this site is 100% secured and SSL enabled, uploading your blog’s image to postimg.org, then your images will load 4x times faster.
4. Analyzing and fixing the Mixed Content issue after adding SSL:
Once your blog is on HTTPS then, you may have to change your blog content to make sure it works with HTTPS. If you don’t change this then you might be faced some Mixed Content issue in your blog after adding SSL.
So here’s method to check if your blog getting mixed content issue:
- First, visit your blog with HTTPS (https://www.yourblog.com ) in Google Chrome.
- Then press the Ctrl + Shift + J keys to open the Javascript console tab.
- Look for mixed content errors, there you’ll see some red colored errors like below one.“Mixed Content: The page at ‘https://<your-blog>.blogspot.com/’ was loaded over HTTPS, but requested an insecure script ‘http://<some-url>/script.js’. This request has been blocked; the content must be served over HTTPS.”
- You can easily fix these match content errors, just go to Google Blogger Support page follow each and every step completely then you will get rid of these errors.
Important things to follow:
1.) Sometimes your previously uploaded logo and favicon on your blog are not redirecting to HTTPS so in this case, you need to reupload both logo and favicon and that’s it!
2.) When you searching something using Search Widget in your SSL enabled blogger blog, In this case, you’ll get a mixed content warning like this.
Mixed Content: The page at ‘https://api.howtoshout.com/‘ was loaded over a secure connection, but contains a form which targets an insecure endpoint ‘https://api.howtoshout.com/search’. This endpoint should be made available over a secure connection.
This error is occurring due to the Search Widget of Blogger, to fix this you need to go to your Blogger Dashboard>> Theme >> Edit HTML
- Then find this code using Ctrl + F
<form expr:action='data:blog.searchUrl'>
- and replace it with
<form expr:action='data:blog.searchUrl.https'>
- Then Save your Theme.
5. Things to do After Migrating To HTTPS From HTTP
After successfully migrated your blogger blog from HTTP to HTTPS, no this is the final part of this guide, so you need to let Google know that you’ve migrated your blog to HTTPS, so Google needs to crawl and index your blog with HTTPS. This part will help you to make your blogger blog more SEO optimize and improve your ranking in Google, Bing, and other search engines. So let’s do this.
First, you need to update your Robots.txt file to make your blog SSL compatible.
- Go to Blogger Dashboard and go to your “Search Preference” settings
- In the Crawlers and indexing, replace your old robots.txt file with below one.
User-agent: Mediapartners-Google Disallow: User-agent: * Disallow: /search Allow: / Sitemap: https://www.yourdomain.com/sitemap.xml - Now save your robots.txt file.
After updating Robots.txt file, then you need to resubmit your sitemap with HTTPS version to Google and Bing webmaster tools. For Google Webmaster tool follow below steps
- In Google Search Console, add new property in this way: https://www.yourdomain.com
- After adding the new property and verifying it, then submit your HTTPS version blog’s sitemap.XML like: https://www.yourdomain.com/sitemap.xml
- Finally, your blogger blog is ready to go live on the web, and it is fully SSL certified.
Once you have done with the Google webmaster tool, then you’ll easily add your HTTPS version of your blogger blog in the Bing webmaster tool by yourself.
Why take any risk when I can do this for you? Well…. this is a very long process and required the tech enthusiastic person who has good knowledge about Codes, JS, CDN, SSL……etc. One wrong step will ruin your blog so I can do all these stuff at a very reasonable cost. You can contact me for this work from here and get your blog with HTTPS within some minutes 😉
Final Words
I hope you like this in-depth guide/tutorial, and I’m sure that this tutorial will help you take your blogger blog to the next level and it will improve your ranking in all search engines. If you’ve got any problem or you’re stuck on any step then feel free to ask in comments, and if you appreciate this post then, please do share this post to let more people know about this trick, after all, sharing is caring.